This is part two of the JMeter Process Setup. Part one can be found here: http://dudewheysmehblog.blogspot.com/2011/02/jmeter-process-setup-01.html
The real heart of the Automated JMeter execution process is your Ant build.xml file. This is so essential that the JMeter guys have already included the Ant ant-jmeter-1.0.9.jar file for us in the extras folder! Ah, but I'm getting ahead of myself, let's start from scratch -- this will all be geared toward a setup on a Windows machine -- either a Windows Server or Windows XP/Vista/7.
Recap:
So
Part three can be found here: http://dudewheysmehblog.blogspot.com/2011/04/jmeter-process-setup-03-adding-ant-taks.html.
The real heart of the Automated JMeter execution process is your Ant build.xml file. This is so essential that the JMeter guys have already included the Ant ant-jmeter-1.0.9.jar file for us in the extras folder! Ah, but I'm getting ahead of myself, let's start from scratch -- this will all be geared toward a setup on a Windows machine -- either a Windows Server or Windows XP/Vista/7.
- Download and Install the Java JDK(Java Developers Toolkit).
- The Java Runtime Environment (Java JRE) is included in the JDK
- The JRE and part of the JDK are required for everything to work properly.
- If the JDK's tools.jar is missing, Ant complains about it, which is why we are downloading it.
- You can either
- Download the .exe file and then run it (following the prompts to set it up)
- Or you can just directly run it as it is downloading
- By default, it should install to C:\Program Files\Java\jre6
- Download JMeter on the computer you want to install it on.
- I'd recommend downloading the Binary Zip -- seems the least confusing to me.
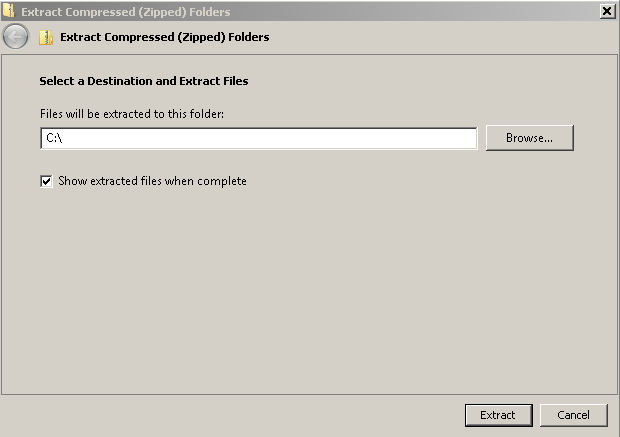
- Unzip the file.
- Right click and choose the "Extract All..." option
- Extract to the C drive [C:\]. (Note you can extract to anywhere you want, but for simple set up and ease of explaining, I'll assume you're just going to follow this guide, step by step.)
- This will install it in a subfolder named after the zip file, which at the time of this writing is jakatarta-jmeter-2.4
- Download Apache Ant on the computer you want to install it on.
- Again, I'd recommend getting the Binary Zip.
- Unzip the file using the same method above.
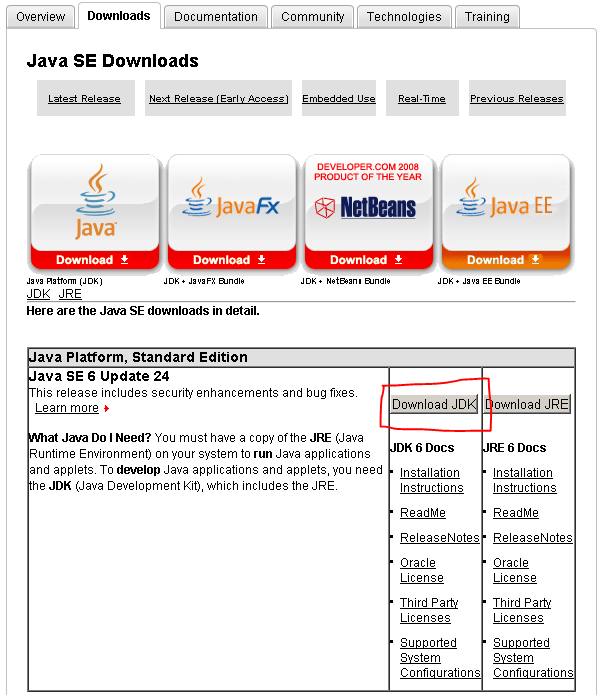 |
| Downloading the Java Development Toolkit |
 |
| The JMeter download page. |
 |
| Extracting in Windows XP |
 |
| Extracting in Windows 7 |
 |
| The Apache Ant download page. |
Recap:
- Java JRE, JMeter, and Ant are all downloaded.
- Java was installed.
- JMeter and Ant were both extracted.
To get everything to work together properly, we need to do a couple of things:
- Add environment variables so that we can call these programs from the command line with less typing.
- Add .jar files to the proper class paths.
 |
| Windows Key + R will open the command prompt |
- Open up a command prompt (Windows Key + r) > cmd.
- In the command prompt enter the command:
- If you never had Java installed, you might get an error at this point that says
- If it is installed correctly, it will display something like
- Click start > Right click on My Computer (XP) / Computer (7) > Click on Properties.
- If you're in XP, click on the Advanced tab.
- If you're in Vista/7, click on Advanced System Settings in the left navigation section.
- Click on Environment Variables (at the bottom).
- In the System Variables section, Add a "New..." variable named JAVA_HOME with the value C:\Program Files\Java\jdk1.6.0_24 (or wherever you have it installed).
- In the System Variables section, Add a "New..." variable named ANT_HOME with the value C:\apache-ant-1.8.2 (or wherever you have it installed).
- In the System Variables section, "Edit.." the Path variable.
- After the last entry in the value, add a semi-colon ;
- Then enter the Ant bin location, either C:\apache-ant-1.8.2\bin; or %ANT_HOME%\bin;
- Click Okay to accept the changes to the Environment Variables and Okay to accept the chagnes to the System Settings.
- Verify that ant works correctly now.
- In the command prompt type
- If at all nothing is happening, reboot your computer and try it again. You should get a message saying:
- If it still refuses to work, manually go to the Ant/bin folder and execute the ant.bat file. Sometimes this seems to kick it into working.
- You can look here for more information on properly installing Ant.
- Add JMeter functionality to Ant.
- In Windows Explorer, navigate to JMeter's extras folder and copy the file ant-jmeter-1.0.9.jar.
- Navigate to Ant's lib folder and paste it. This is referred to as "adding the JMeter classpath to Ant."
java -version
'java' is not recognized as an internal or external command, operable program or batch file.
java version "1.6.0_24"
Java(TM) SE Runtime Environment (build 1.6.0_24-b07)
Java HotSpot(TM) Client VM (build 19.1-b02, mixed mode, sharing)
 |
| Java is not installed (on XP) |
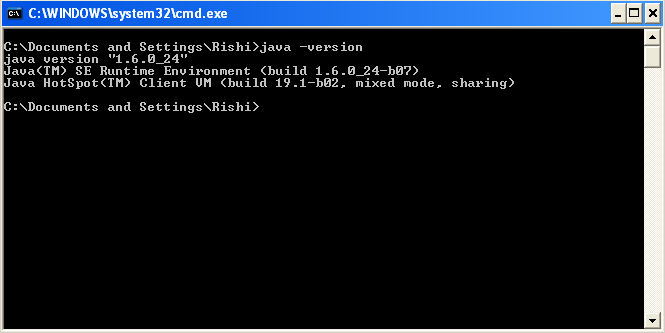 |
| Java is installed (on XP) |
 |
| Environment Variables in XP |
 |
| Environment Variables in Windows 7 |
ant -version
Apache Ant(TM) version 1.8.2 compiled on December 20 2010
Congratulations!! You've not got most of the setup completed! The next steps will be to extend Ant's capability further by adding two more classpaths, and then to create our buildfile, and our folder setup!
Part three can be found here: http://dudewheysmehblog.blogspot.com/2011/04/jmeter-process-setup-03-adding-ant-taks.html.
No comments:
Post a Comment